SubItUp SSO with Azure AD
Subitup SSO supports LDAP, as part of this Azure Active Directory also works.
Note: In Azure AD we have to register separately for each application i.e., Subitup
Accounts application, Mobile application and TimeClock application.
Repeat the below steps for each application separately and, in each step, check the
application specific settings and apply accordingly.
Azure Active Directory:
Setup App registrations in Azure AD for Subitup:
Step 1:
1. Navigate to “Azure Active Directory”(AAD).
2. Navigate to “App registrations” from the left-hand navigation bar. Click on “New
registration”.
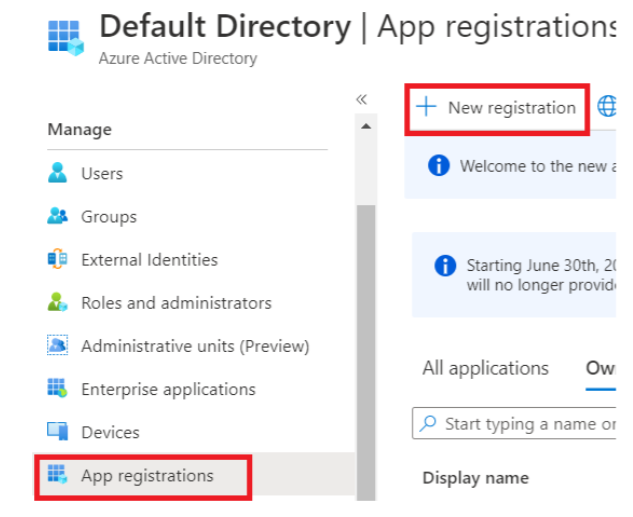
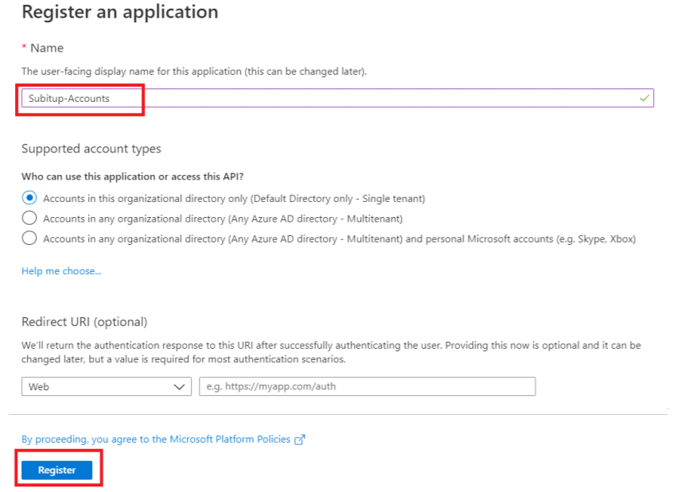
3. Enter a name for the app registration and then click “Register”. (Please refer to
below screenshot)
Name for each application:
a. Accounts Application: Subitup-Accounts
b. Mobile Application: Subitup-Mobile
c. Timeclock Application: Subitup-Timeclock
Step 2:
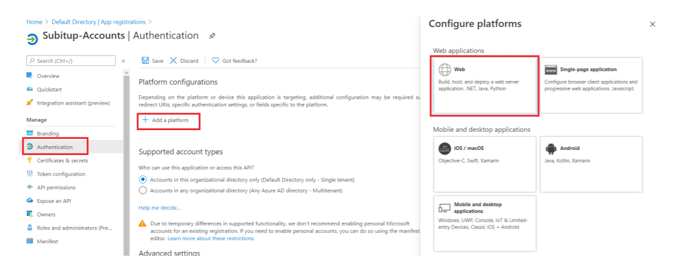
1. Once the App is registered, from the left nav, go to “Authentication” under
Manage section.
2. Click on “Add a platform” and select “Web”.
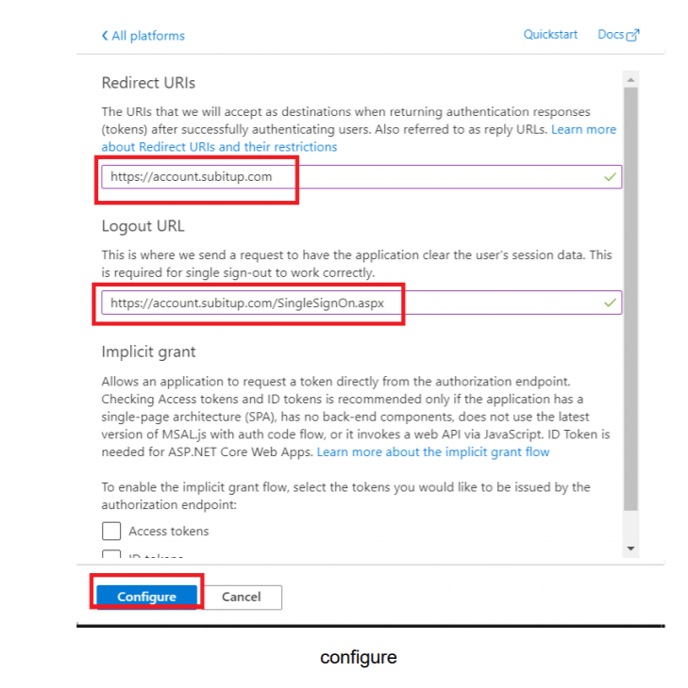
3. As we have multiple Redirect URIs for each application, please configure one
URI at a time.
I. Add the first Redirect URI, Logout URL and click on “Configure”. Refer to
below image: configure
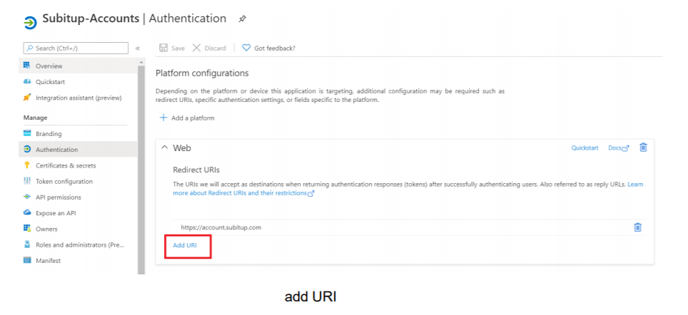
II. Now you can see a “Add URI” button, click on it to add the remaining
Redirect URIs of that particular application. Refer to below image: add URI
Redirect URIs & Logout URL for each application:
a. Accounts Application:
i. Redirect URIs:
1. https://account.subitup.com
2. https://account.subitup.com/SingleSignOn.aspx
3. https://account.subitup.com/SSO/ADFSDefault.aspx
ii. Logout URL: https://account.subitup.com/SingleSignOn.aspx
b. Mobile Application:
i. Redirect URIs:
1. https://account.subitup.com/SingleSignOn.aspx
2. https://mobilesecure.subitup.com/#singleSignOn
3. https://mobilesecure.subitup.com/SSO/ADFSDefault.aspx
4. https://mobilesecure.subitup.com
ii. Logout URL: https://mobilesecure.subitup.com/#singleSignOn
c. Timeclock Application:
i. Redirect URIs:
1. https://www.timetrackpay.com/SSO/ADFSDefault.aspx
2. https://www.timetrackpay.com
ii.Logout URL: https://www.timetrackpay.com
Step 3:
1. Navigate to “API permissions” from the left-hand navigation.
2. Click on “Grant admin consent for Default Directory” and click on “Yes” when
prompted.
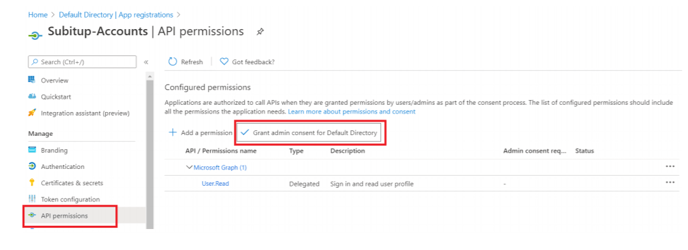
3. Once the permission is granted the status for “User.Read” will be updated to
“Granted...” like below.

Step 4:
1. Navigate to “Expose an API” from the left-hand navigation.
2. Click on “Application ID URI - Set”
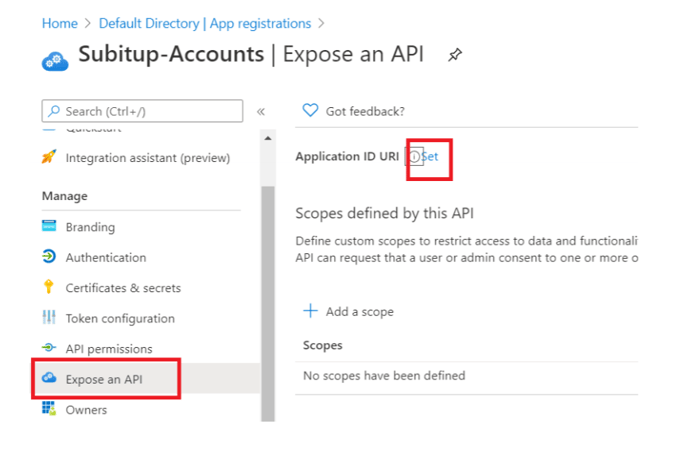
3. There will be default Application ID URI provided, please use them and share those respective Application ID URIs with Subitup Support team.
Add Users to the App registrations:
Here we will see how to Add Azure AD users to the created App registrations.
Step 1:
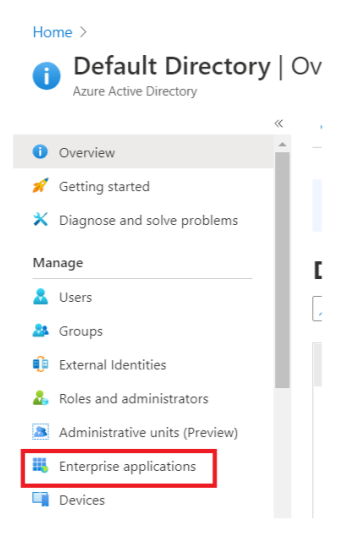
1. Go to Azure AD, from the left-hand nav under “Manage” select “Enterprise
application”.
2. From left-had navigation under “Manage”, select “All applications”. From Application
type dropdown, select “Enterprise Applications” and click on Apply.
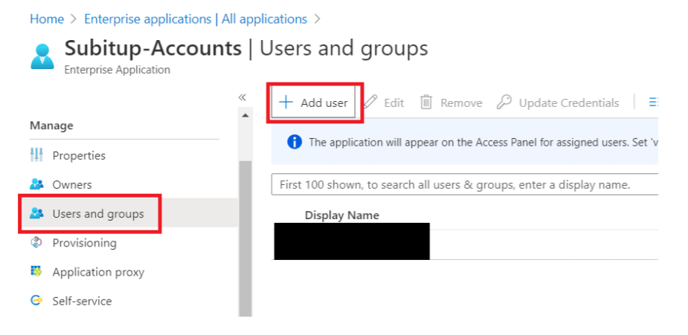
3. From the list click on the respective App registration. (E.g.: Subitup-Accounts)

4. From the opened Enterprise application, from the left-hand nav under “Manage”,
select “Users and groups”.
5. Click on “Add User”.
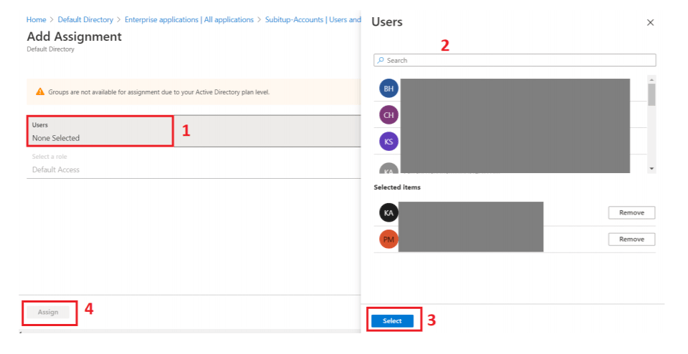
6. On the opened window, click on “Users” and search the users using their email
ids (in the right-side slide-up) who need the SSO login for respective App
registration.
(If you do not find the required email id, please enter the email id manually and
there will be an option to invite them).
7. Once the desired users are selected, please click on “Select” and then click on
“Assign”. (Please refer to the below image with numbering)
8. Note: Please follow the above steps for all the App registrations and add the
Users respectively.
Congratulations!! You are all set to make these configuration changes in Subitup
Accounts Application.